Nursing Pharmacology: Adrenergics & Cholinergics

I had a love/hate relationship with nursing pharmacology for my first year of nursing school. I loved the information but hated learning it. I didn’t figure out how to learn it effectively until we were 70% finished.

Since then I keep thinking, “there has to be a better way to learn nursing pharmacology.” I recently spent an hour with a new nursing student explaining how to remember adrenergic and cholinergic medications. So, while it was fresh in my mind, I thought I’d try recording an interactive whiteboard video with my strategy for remembering adrenergic, antiadrenergic, cholinergic and anticholinergic medications.

If the video doesn’t play, click here to view it on Edureations’ website. If you need a refresher on the anatomy and physiology of the autonomic nervous system, check out this Khan academy video.

If you watch the video, I’d love your feedback!

What’s in the video?

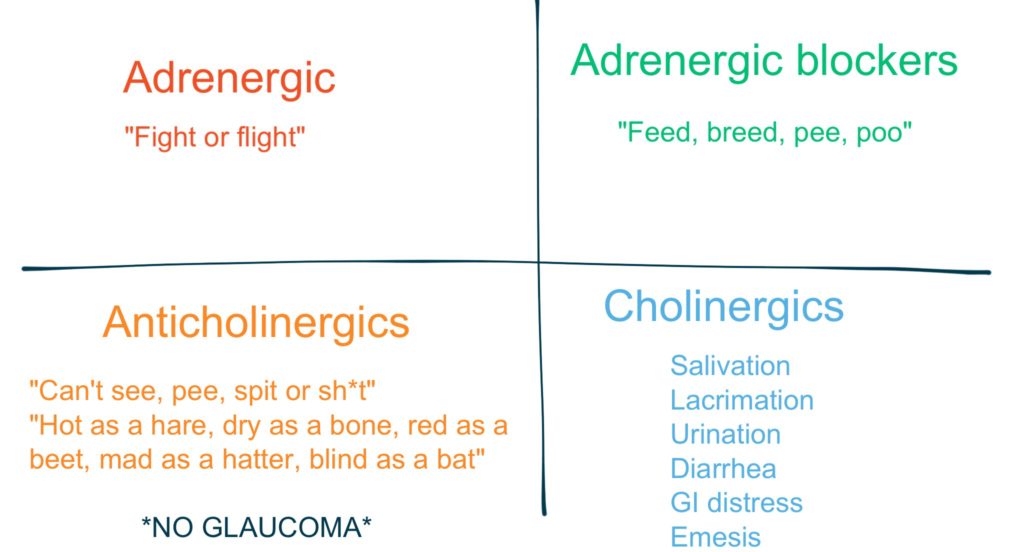
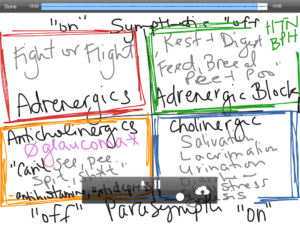
My go-to grid for exams

I like using this grid layout because:

  • There are similarities between Adrenergics and Anticholinergics (I think of an angry, flushed, constipated person)
  • There are similarities between Adrenergic Blockers and Cholinergics (increasing digestion and urination)


Adrenergic vs. Antiadrenergic vs. Cholinergic vs. Anticholinergic

How to remember side effects

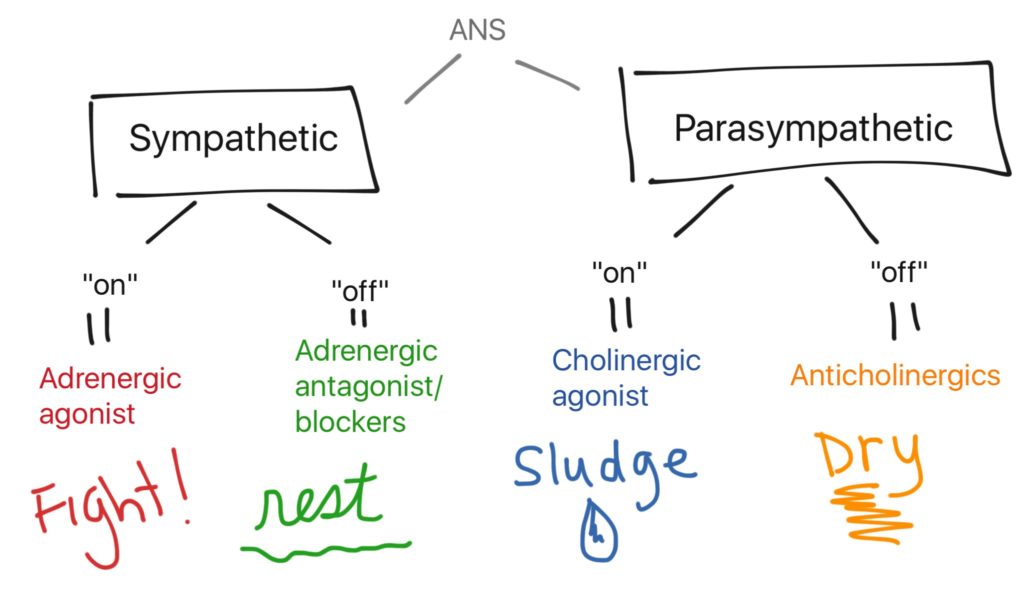
Adrenergic and Cholinergic medications mimic or block the autonomic nervous system (ANS), which is made up of the sympathetic and parasympathetic nervous systems.

adrenergic cholinergic flow chart: fight, rest, sludge, dry

Adrenergic agonists

Adrenergic agonists turn on the sympathetic nervous system = “fight or flight” side effects like:

  • dilated eyes (to see better)
  • bronchial dilation (to improve oxygenation)
  • increased heart rate and blood pressure (to increase blood flow)
  • increased glucose levels (to get more energy to the cells hat need it)
  • decreased urination and gastrointestinal (GI) motility (it’s unlikely you’ll stop to use the restroom when you’re on the run!)
  • decreased uterine contractions (do you really want to give birth when you’re in danger?!)

Basically, all the blood moves to the important parts of the body (heart, lungs) and away from digesting. Drugs include epinephrine, norepinephrine, and albuterol.

Adrenergic blockers/antagonists

Adrenergic blockers/antagonists (antagonists are the “against” the hero in literature) turn “off” the sympathetic nervous system which leads to “rest, digest, pee, poo.” This is the opposite of “fight or flight.”

  • Increased uterine contraction (it’s a good time to have a baby!)
  • decreased heart rate and glucose (you don’t need as much energy or blood when you’re relaxing)
  • bronchial constriction (which is why some of these meds may be contraindicated for patients with respiratory problems),
  • increased GI motility and urination

Cholinergic agonists

Cholinergic agonists mimic the parasympathetic nervous system by increasing Acetylcholine (ACh). This results in “SLUDGE:”

  • Salivation,
  • Lacrimation (tears/crying)
  • Urination (Peeing)
  • Diarrhea
  • GI distress
  • Emesis (vomiting)

Basically a person with excess ACh is going to have fluid coming from everywhere.

Anticholinergics

  • Anticholinergics are the opposite of Cholinergics, they make a patient DRY by turning “off” the parasympathetic nervous system. Patients “can’t see, can’t pee, can’t spit, can’t sh*t.”
  • Another rhyme that represents these side effect is “Hot as a hare, dry as a bone, red as a beet, mad as a hatter, blind as a bat”.
  • Do NOT give anticholinergics to patients with glaucoma (The way I remember this is: it can be hard to see when you’re eyes are dry).

The tools I used

  • iPad mini
  • The stylus I used is too bulky. If I do this in the future I’m going to get a fine-tipped stylus like this one.
  • Interactive Whiteboard App
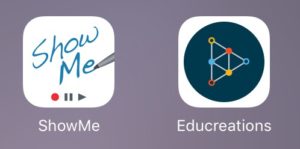
    • ShowMe (1st attempt)showme
      • The end product was, well… boring and my digital writing was surprisingly sloppy (see the image!). The tool was okay.
      • I wasn’t thrilled about the idea of having to either pay OR make my content shareable on their platform in order to publish it.
      • I liked that I could select a variety of colors (Edureation limited me to 5 colors).
    • Edureations (Final product)
      • I liked the ability to edit the video as I made it and I can share my file without paying or showme-vs-educreationsmaking it part of the Edureations’ database.
      • It was also easier to move components around on the screen and there was the option to include grids and lines.

This blog contains affiliate links.

Unemployed in Washington? Here’s some useful resources.

Losing a job, or finding yourself unemployed can be a confusing, self-esteem-destroying experience. You may feel lost in a sea of uncertainty. You may be asking yourself “How will I pay my rent or mortgage?” “How will I afford groceries next week?” or “Where am I going to find a job?”

To my friends who lost their jobs yesterday, I am so sorry for the shocking change in direction you just experienced. The world of unemployment can be confusing, so I thought I would share some links to WA state resources that I discovered in the year since I accepted the buyout offer:
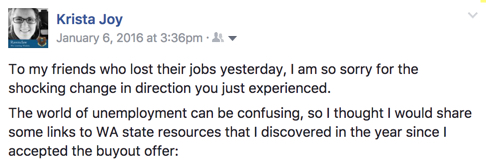
You are not alone. There are many who find themselves in similar places and many others who have been there and can say, “I’ve been at rock bottom and I’ve found my way back up.”

I have two things to offer you:

  1. 5 things to remember on your very worst day by my friend Jayson Bradley.
  2. Information about some of the fantastic services Washington state offers to help you get back on your feet. I discovered these resources when I went back to school to become a nurse after I accepted a buyout offer from my employer.

#1 See if you qualify for a variety of services

Answer a few questions and this site will show what federal, state and local services you qualify. You can even apply for some of them on this site.

#2 Apply for state health insurance

Apple Health is offered for no monthly fees and no copays if you have no income. You can read about how ObamaCare made a huge difference in my ability to explore new opportunities. We don’t know what health care will look like as Trump takes office, but I doubt that the state of Washington’s commitment to making healthcare accessible will change.

#3 Get help to find a new job

In Wenatchee, we have Worksource and Skillsource. Together they can help you brush up on (or gain new) skills to make you more marketable, help you build/refine your resume, help you identify a job fit (both for your personality and the local job market) and connect you with employers. This site can help you find services that are close to you. If you apply for unemployment you’ll probably receive information, but it doesn’t hurt to contact them directly.

#4 Request re-evaluation if your income history prevents you from accessing a service

If you recently lost a good job, your income history may cause you to be rejected for some services. You can often fill out paperwork saying that you lost your job/are unemployed and they will re-evaluate.

If you’re thinking about going back to school or getting additional training

#5 See if you qualify for money for education/training

If you are interested pursuing a career in a new field that requires training, the state has funds that you may qualify for. This website can quickly identify whether you qualify for WorkFirst, Opportunity Grant, Worker Retraining, or Basic Food Employment and Training (BFET).

WorkForce retraining paid tuition for my prerequisites and training to become a CNA. I didn’t qualify for unemployment because I was in school during normal business hours, but I qualified for BFET and received an Opportunity Grant that covered my books and 1/2 my tuition for my 2 years of nursing school. This was VERY helpful because I have a previous Bachelor’s Degree which disqualified me from a lot of other grants and subsidized loans.

I discovered that I qualified for these programs by talking to the Workforce retraining staff my local community college (Wenatchee Valley College) and they were unbelievably helpful! Here’s the link for the team at Whatcom Community College. If you go to the website for your local community college and look for some of the keywords (opportunity grant, workfirst, workforce, BFET) you’ll probably be able to find contact information for local programs.

#6 SNAP / Food Stamps / BFET

If you go back to school after a layoff, you may also qualify for SNAP (previously called food stamps) through BFET. This provides money for food based on your family size and will help you find a job when you finish whatever training you are doing.

Because I qualified for SNAP I also qualified for a free (not-so-smart) phone. Through BFET I will also receive help finding a job after I graduate.

Closing thoughts

It was humbling to accept the government support after being so self-sufficient. Accepting this help has helped me pursue a life of purpose and I look forward to taking the skills that this help has afforded me and helping others in the future.

Effective meetings & effective note-taking

This is the last post in my series on organization. Meetings may not be something that you immediately tie to being organized, but I’m including it because meetings can be either a huge time suck or a useful tool in creating organization among a group of people. And I can’t talk about meetings without talking about taking effective notes.

Stop wasting time; only do effective meetings

I hate going to useless meetings. When working as a project manager for a tech company I spent a large portion of my life in meetings.meetings

I have led meetings with CEOs, CFOs and Executive Vice Presidents. I have led training sessions with dozens of peers and team members. Here’s what I’ve learned: If you absolutely have to lead or go to a meeting, make sure it’s a useful investment of time for everyone.

  • If you’re leading: Know why you’re meeting and what you want to accomplish by the end of the meeting. Then tell participants what it is so they can be prepared.
  • If you’re attending: Ask what the goal is so you can be prepared to participate (and to help prompt the meeting organizer to think about why they want a group of people together!)
  • Bring everything you may need with you (notes and documents)
  • Take effective notes (see below).
  • Wrap up a meeting with a list of who is going to do what by when and send that out to attendees.

This last point is really important. I can’t tell you how many meetings I’ve wrapped up with where people have completely different ideas of where we landed/where we were headed. #disasteraverted

Learn how to take effective notes

Why you should take notes

Taking notes serve a few purposes:

stack of steno pads

4 years of meeting notes

  1. They can help you focus on what’s actually happening in a meeting.
  2. It makes it look like you are engaged and participating.
  3. It’s a good place to jot potential action items.
  4. It’s a good place to jot ideas you want to come back to.
  5. You have something to refer back to later if you need to.

My primary reason for note-taking used to be #1 and #3. Since starting nursing school I actually look back at my notes.

How to take notes

When I started actually looking back at my notes I realized that I often had no idea what they meant. So I started exploring note-taking techniques.

  • A combination of Mind mapping and something that resembles the “bullet” portion of the Bullet Journal seems to work for me.
  • I’m intrigued by the Smart Wisdom method and plan to explore this in the future
  • The Cornel method didn’t really stick with me, but it may be useful to check out.

Where to take notes

While I like to use technology for most things, I prefer handwriting notes in meetings or lectures. When I type, I have a harder time differentiating what’s important and don’t necessarily remember what I typed. There is also a bunch of research about how handwriting helps you remember.

I’m a fan of Gregg-ruled steno pads.

But if you like to go digital with your note-taking, you can check out [my favorite note apps here].

Check out the rest of this series

This blog contains affiliate links.


Don’t let papers over-run your life: file organization

Filing is the bane of my existence. I know some organization-lovers who enjoy the process of alphabetizing, but I’m not one of them. I wished I never had to file another piece of a paper, but the truth is I have important documents that I need to be able to find when I need them.

As part of my series on organization, here are my tips on how I keep up with file organization.

Go digital whenever possible

scan-appI highly recommend scanning important documents and saving them on a cloud drive. This reduces the amount of paper I carry around and makes it so easy to find the important things I need.

To do this you’ll need a Scanner App + an app for storing documents.

  • Scanning app:
    • I use Turbo Scan
      • It automatically identifies the edges of the document and allows you to back-up all documents to the cloud.
      • $4.99. Available on iPhone and Android
  • Cloud storagegoogle-drive
    • For the non-techies, you can think of this like saving files in a folder on your computer. But instead of the file being in only one place (the computer where you saved it) it’s saved on the internet so you can access it anywhere.
    • I use Google Drive because I can use Google Docs and Google Sheets to create/edit documents online without needing download the file.
    • Other popular drive apps: Dropbox, iCloud

Just the other day this came in handy because I forgot a paper for a meeting, but I had scanned it and could immediately email it to the person I was meeting with.

Tips so you can find your digital files later

  • Keep all of your documents about one topic in one place (as opposed to having some attached to emails, some in your google drive, and some on your computer). I had this problem during the first semester of nursing school and spent way too much time trying to figure out where a file I needed was located.
  • Be consistent and detailed in naming files so you can easily search for them later.
    • Sometimes I start the file name with YYMM (YY=year, MM=Month) so I can easily sort documents in date order.

For paper files

As much as I’d like to have no paper files, I have no intention of taking the time to scan everything that I need to keep (tax-related, health-related, bills, etc.). So here’s how I handle my papers:

Active papers

For the papers that I need to do something with I use clear wall files. I put them on the wall using 3m strips. I label them “to do,” “to read,” and “to shred.” The cost for a set of 2 is about $11.


To File

I keep a box in my closet called “to file.” When that box starts to overflow (every 3-6 months), I file them in my archive folders.

Archive Files

When I finally get around to actually filing, I use a file box (approximate cost of $13-15) and hanging folders ( approximate cost of $10-20).


I invest some time once every year or two to create all the folders I could possibly need so when it’s time to file I can just drop in paperwork. And honestly, if I’m filing and I don’t have a folder for it, sometimes I just dump it back in my “to file” box.

Then when I do my taxes I grab all the financial files for that year and put them all together and toss other files from the year that I won’t need.

Check out the rest of this series

This blog contains affiliate links.